Code
print("Hello World!!")[1] "Hello World!!"이 수업은 코딩을 전혀 모르는 사람들을 대상으로 디지털글쓰기 수업을 위해 만들었습니다.
자신만의 포트폴리오, 레포트, 웹페이지를 만드는 마크다운 방식의 글쓰기를 먼저 배울것입니다.
그리고 그 내용물을 채울 때 필요한 R 언어에 대한 기초를 배우고, 텍스트 분석까지 해보는 것을 목표로 하고 있습니다.
R 언어 간단 소개
두명의 뉴질랜드 통계학자가 만듦 : 로버트 젠틀맨(Robert Gentleman)과 로스 이하카(Ross Ihaka)
해들리 위컴에 의해 빅데이터 툴로 발전함 (대표적 : ggplot, tidyverse)

줄리아실기 : 문자분석(tidytext), 머신러닝(tidymodel)

언어의 특징 : 1부터 시작 (다른 언어들은 0부터 시작)

이 많은 것을 다 배워야 할까? 어렵다.
R에서 프론트엔드를 하려면 어떻게 할까? 즉 눈에 보이는 문서, 웹페이지를 만들려면?
Quarto는 RMarkdown 기반 디지털 글쓰기 양식이다.
R도 모르는데 Quarto는 또 무엇인가?
잘 모르지만 이 강의를 듣게 되면 무엇을 할 수 있는지를 보자.

https://quarto.org/docs/gallery/
https://r2bit.com/bitSlide/dashboard_202404.html#/%EC%BF%BC%ED%86%A0-1
Markdown 문법 배우기 (1주차)
Documents 를 좀 더 확장해서 배우기 (2주차)
Dashboard 만들기 (3주차)
텍스트 분석 (4주차)
문자열 정제 (stringr)
관계도 분석 (tidygraph, ggraph)
참고사이트
[문자열함수 : stringr]https://bookdown.org/sulgi/r4ds/strings.html
[한국문자분석 : bitNLP]https://github.com/bit2r/bitNLP
[문자분석 : tidytext]https://github.com/juliasilge/tidytext
[관계망 분석 : tidygraph]https://github.com/thomasp85/tidygraph
[관계망 분석 : ggraph] https://github.com/thomasp85/ggraph
[Quarto 문서화 : quarto]https://quarto.org/docs/presentations/revealjs/
(#1~5까지 하고, #6,7은 나중에~~)
RStudio 설치 https://posit.co/download/rstudio-desktop/
Quarto CLI설치 : https://quarto.org/docs/download/
Latex 설치 : (Rstudio 터미널창) $ quarto install tinytex
출판용 사이트 가입 : https://quartopub.com/
github 가입 : https://github.com/
git 설치 : https://git-scm.com/download/win
[Quarto ]https://quarto.org/docs/presentations/revealjs/
프로그램을 배울 때, 다운로드, 설치, 환경설정만 하면 50%는 이미 배운것입니다. ^^

print("Hello World!!")[1] "Hello World!!"R은 통계 전문 프로그래 언어이지만 코딩 언어는 나중에 배우고 우리는 문서 작성 Tool 로서 Quarto라는 새로운 세계를 먼저 배울 것입니다.
우선 패키지 하나만 설치하고 갑시다. (tidyverse : 패키지 선물세트)
#install.packages("tidyverse)
library(tidyverse)[참고문헌 1] 한국 R 사용자 협회 문서
https://r2bit.com/gpt-quarto/part_markdown.html
[참고문헌 2] Quarto 사이트 https://quarto.org/docs/authoring/markdown-basics.html
[참고문헌 3] R https://rchemistblog.com/blog/posts/2023-01-19-quarto-intro/
따라해보기~~ (50분)
각자 주제를 하나 정한 후 그 내용으로 문서를 작성해봅니다. 문서 내용은 AI에게 물어서 작성해봅니다.
Bing chat : https://www.bing.com/chat?form=CONVRD
Openai : https://chatgpt.com/
클로드3 : https://claude.ai/
특별히 AI에게 “마크다운 문서로 작성해줘” 라고 하면 마크다운 문법으로 글, 표를 작성해줍니다.
이미지는 “images” 폴더를 하나 만들어서 그 안에 저장해줍니다.
File -> New Project -> New Directory -> Quarto Website -> Directory 이름 적기
“index.qmd” 로 저장하기
문서가 다 작성되었으면 윗쪽 Render 누르면 html 파일이 만들어짐.
폴더창에 “images” 를 만든 후 이미지 저장
about.qmd 파일 안에 이미지 넣기
콘솔창의 터미널로 가기
$ quarto publish quarto-pub
Authorize (Y/n) -> 엔터, 엔터

지난번 작성한 프로젝트를 열어봅시다. (QuartoPub에 웹페이지로 올린 프로젝트)
또하나의 qmd 파일을 추가해봅시다.
_quarto.yml 파일을 보자. about 윗쪽에 새로운 qmd 파일을 넣자

---
title-block-banner: images/banner.jpeg
------
format:
html:
toc: true
toc-location: left
------
format:
html:
other-links:
- text: NASA Open Data
href: https://data.nasa.gov/
---https://icons.getbootstrap.com/
---
format:
  html:
    other-links:
      - text: NASA Open Data
        href: https://data.nasa.gov/
    code-links:
      - text: Data Import Code
        icon: file-code
        href: data-import.py
---format:
html:
link-external-icon: true
link-external-newwindow: true
link-external-filter: '^(?:http:|https:)\/\/www\.quarto\.org\/custom'lightbox: true
::: {.panel-tabset}
#### 대한민국
수도 : 서울
#### 중국수도 : 베이징
#### 일본수도 : 도쿄
수도 : 서울수도 : 베이징수도 : 도쿄[참고]https://quarto.org/docs/authoring/callouts.html
::: {.callout-note}
하늘색 : 간단한 코멘트 넣기 (강조할 때는 단어 앞뒤고 `로 감싸기)
Note that there are five types of callouts, including:
`note`, `warning`, `important`, `tip`, and `caution`.
:::

::: {.callout-tip}
## Tip with Title
연두색 : 팁 (팁에 제목 넣기)
This is an example of a callout with a title.
:::

::: {.callout-warning}
## Warning with Title
노란색 : 주의
This is an example of a callout with a title.
:::


::: {.callout-important}
## Important with Title
분홍색 : 중요
This is an example of a callout with a title.
:::


::: {.callout-caution collapse="true"}
## Expand To Learn About Collapse
주황색 : 펼쳐보이기 (팁에 제목 넣기)

This is an example of a 'folded' caution callout that can be expanded by the user. You can use `collapse="true"` to collapse it by default or `collapse="false"` to make a collapsible callout that is expanded by default.
:::하늘색 : 간단한 코멘트 넣기 (강조할 때는 단어 앞뒤고 로 감싸기) Note that there are five types of callouts, including:note,warning,important,tip, andcaution`.
연두색 : 팁 (팁에 제목 넣기) This is an example of a callout with a title.
노란색 : 주의 This is an example of a callout with a title.
분홍색 : 중요 This is an example of a callout with a title.
주황색 : 펼쳐보이기 (팁에 제목 넣기)
This is an example of a ‘folded’ caution callout that can be expanded by the user. You can use collapse="true" to collapse it by default or collapse="false" to make a collapsible callout that is expanded by default.
tip box를 언급할 때는 @tip-“이름” 으로 부를 수 있다.
See Tip 1…
https://quarto.org/docs/output-formats/pdf-basics.html
---
title: "My document"
format:
  pdf:
    toc: true
    number-sections: true
    colorlinks: true
---https://quarto.org/docs/output-formats/typst.html
---
title: "Hello Typst!"
format:
  typst:
    toc: true
    section-numbering: 1.1.a
    columns: 2
---https://quarto.org/docs/output-formats/ms-word.html
---
title: "My Document"
format:
  docx:
    toc: true
    number-sections: true
    highlight-style: github
---https://r2bit.com/gpt-quarto/dw_slideshow.html
---
title: "Habits"
author: "John Doe"
format: revealjs
---

## 제목1

- 내용1
- 내용2

## 제목2

- 내용1
- 내용2github 가입하기
new repository 만들기 page -> main -> save
git download https://git-scm.com/
설치 완료 후 Git bash 열고 환경 설정
https://hackmd.io/@oW_dDxdsRoSpl0M64Tfg2g/ByfwpNJ-K
File - New Project - Versioin Control - github 레포지토리 주소 넣기

OPENAI API 사이트 방문
https://openai.com/index/openai-api/ https://platform.openai.com/apps
library("TheOpenAIR")
openai_api_key("sk-proj-***")


chat("강한 왕자와 약한 공주에 대한 짧고 재미있는 이야기를 한국어로 써 보세요.",  model="gpt-3.5-turbo-0125",
temperature=0.8)[관련자료] https://blog.zarathu.com/posts/2023-12-11-quarto-dashboard/index.html
---
title: "Display 기술 소개"
format: dashboard
editor: visual
---
## Quarto

Quarto enables you to weave together content and executable code into a finished document. To learn more about Quarto see <https://quarto.org>.


## Row {height=70%}

:::{.card}
Card 1
:::

## Row {height=30%}

### Column {width=40%}
:::{.card}
Card 2-1
:::

### Column {width=60%}
:::{.card}
Card 2-2
:::uarto enables you to weave together content and executable code into a finished document. To learn more about Quarto see <https://quarto.org>.
## Row {height=70%}
:::{.card}
Card 1
:::
## Row {height=30%}
### Column {width=60%}
#### Row {.tabset}
:::{.card}
Card 2-1
:::
:::{.card}
Card 2-2
:::
:::{.card}
Card 2-3
:::
### Column {width=40%}
:::{.card}
Card 3-1
:::---
format:
dashboard:
nav-buttons:
- icon: github
href: https://github.com/waterfirst/sci_journal/
aria-label: GitHub
- icon: gitlab
href: https://www.knowledgepen.com/
aria-label: 지식펜
------
logo: images/logo.png
---
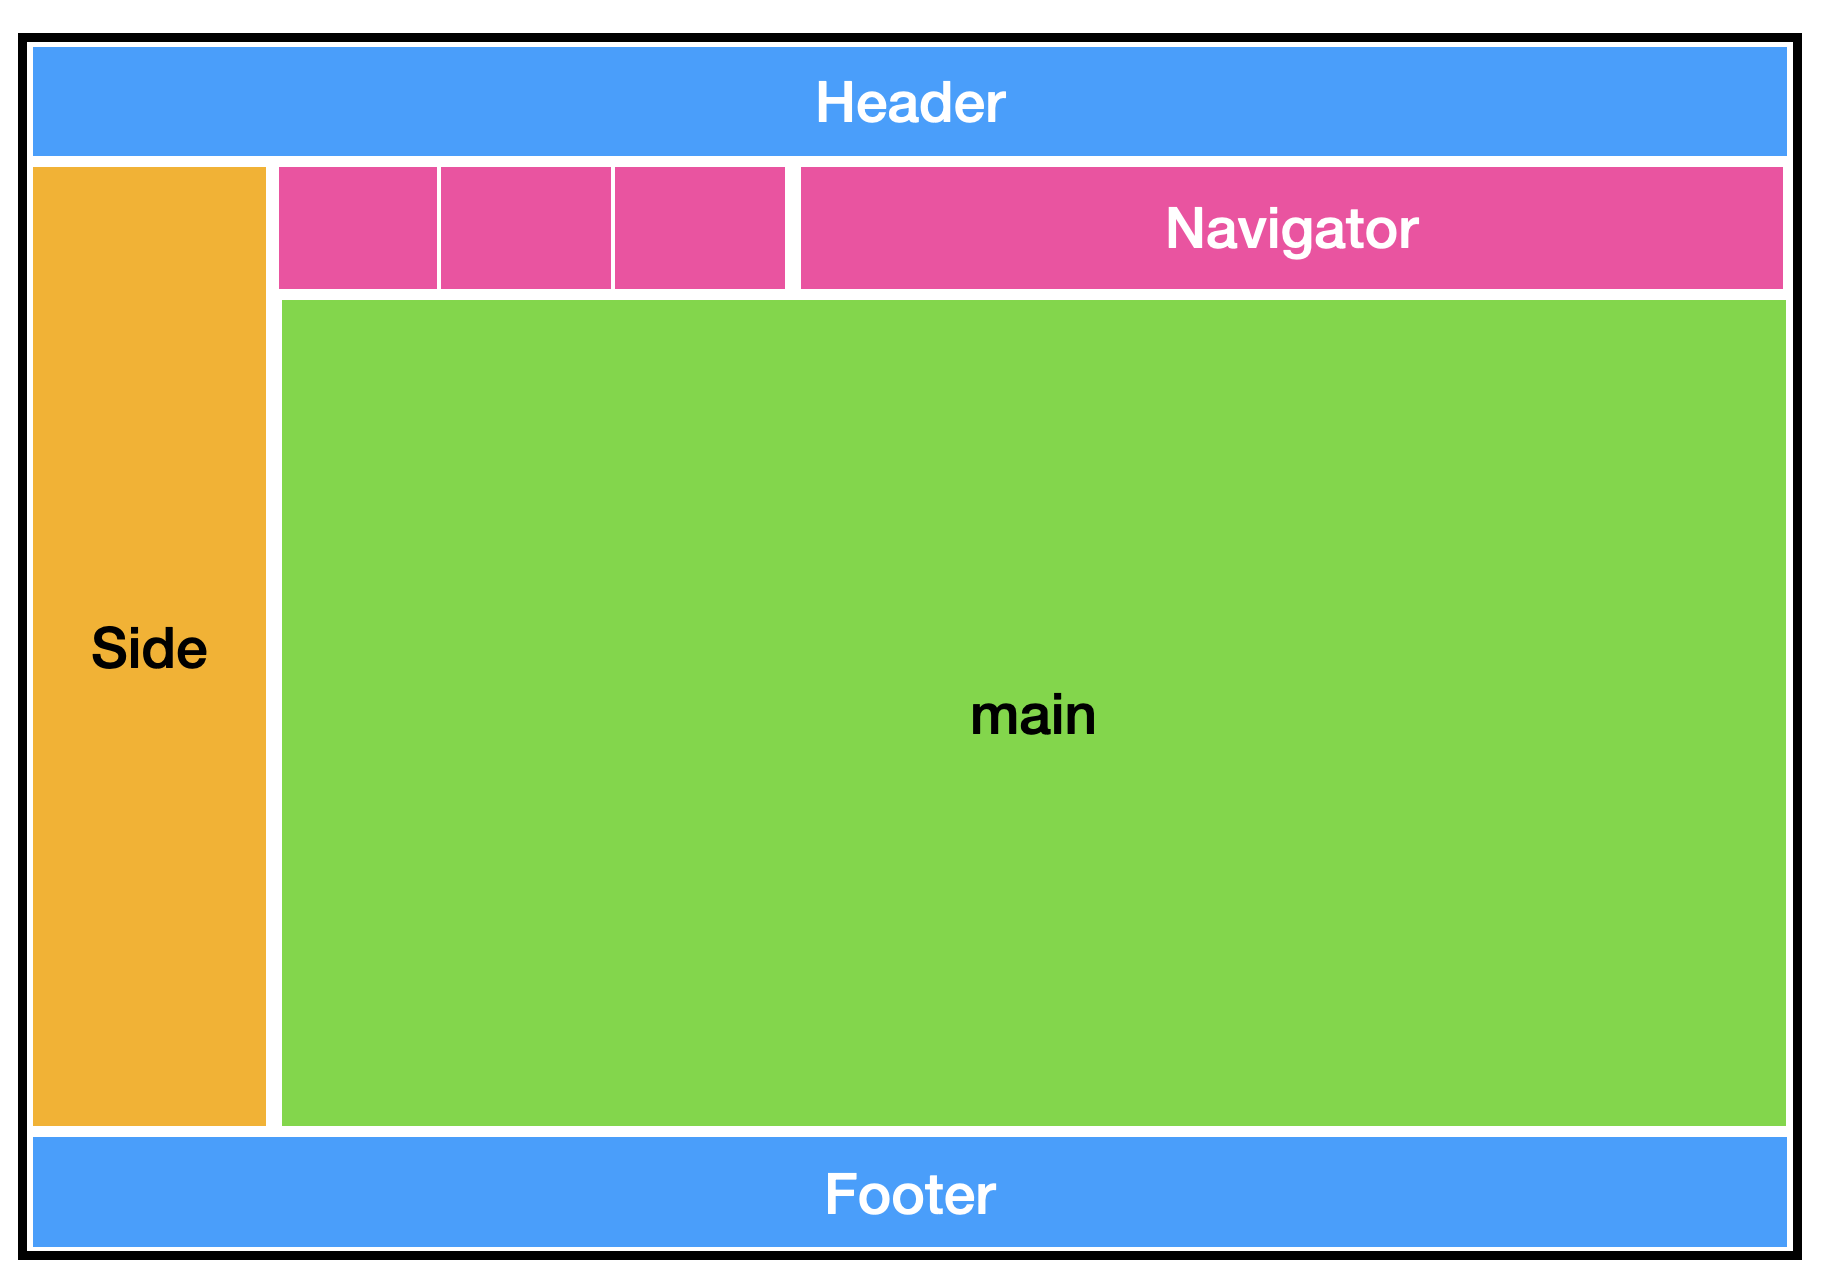
#  {.sidebar}

This dashboard displays an overview of the thesis guidance process.:

**강사: [Choi Pro](https://scholar.google.co.kr/citations?user=RUPcxioAAAAJ&hl=ko)**

**Tools : R, Quarto**

<br>

::: {.callout-note collapse="true"}
## 강사 프로필

디스플레이 전문가 \n응용물리/화학/플라즈마/유기재료/광학/기기분석/시뮬레이션

|                      |                    |
|:---------------------|:-------------------|
| **이 력**            | **내용**           |
| 경 력                |                    |
| LCD                  | 유기재료, 광학     |
| OLED                 | Dry Etch, 포토재료 |
| Micro LED            | Prining 공정, 재료 |
| 빅데이터 분석기사    | R                  |
| Simulation           | Flexpde            |


:::
# AAA

Sidebar content
## Quarto

Quarto enables you to weave together content and executable code into a finished document. To learn more about Quarto see <https://quarto.org>.


# BBB

Sidebar content
## Quarto

Quarto enables you to weave together content and executable code into a finished document. To learn more about Quarto see <https://quarto.org>.knitr::kable(mtcars) # kable
DT::datatable(mtcars) # DT
reactable::reactable(mtcars) # reactable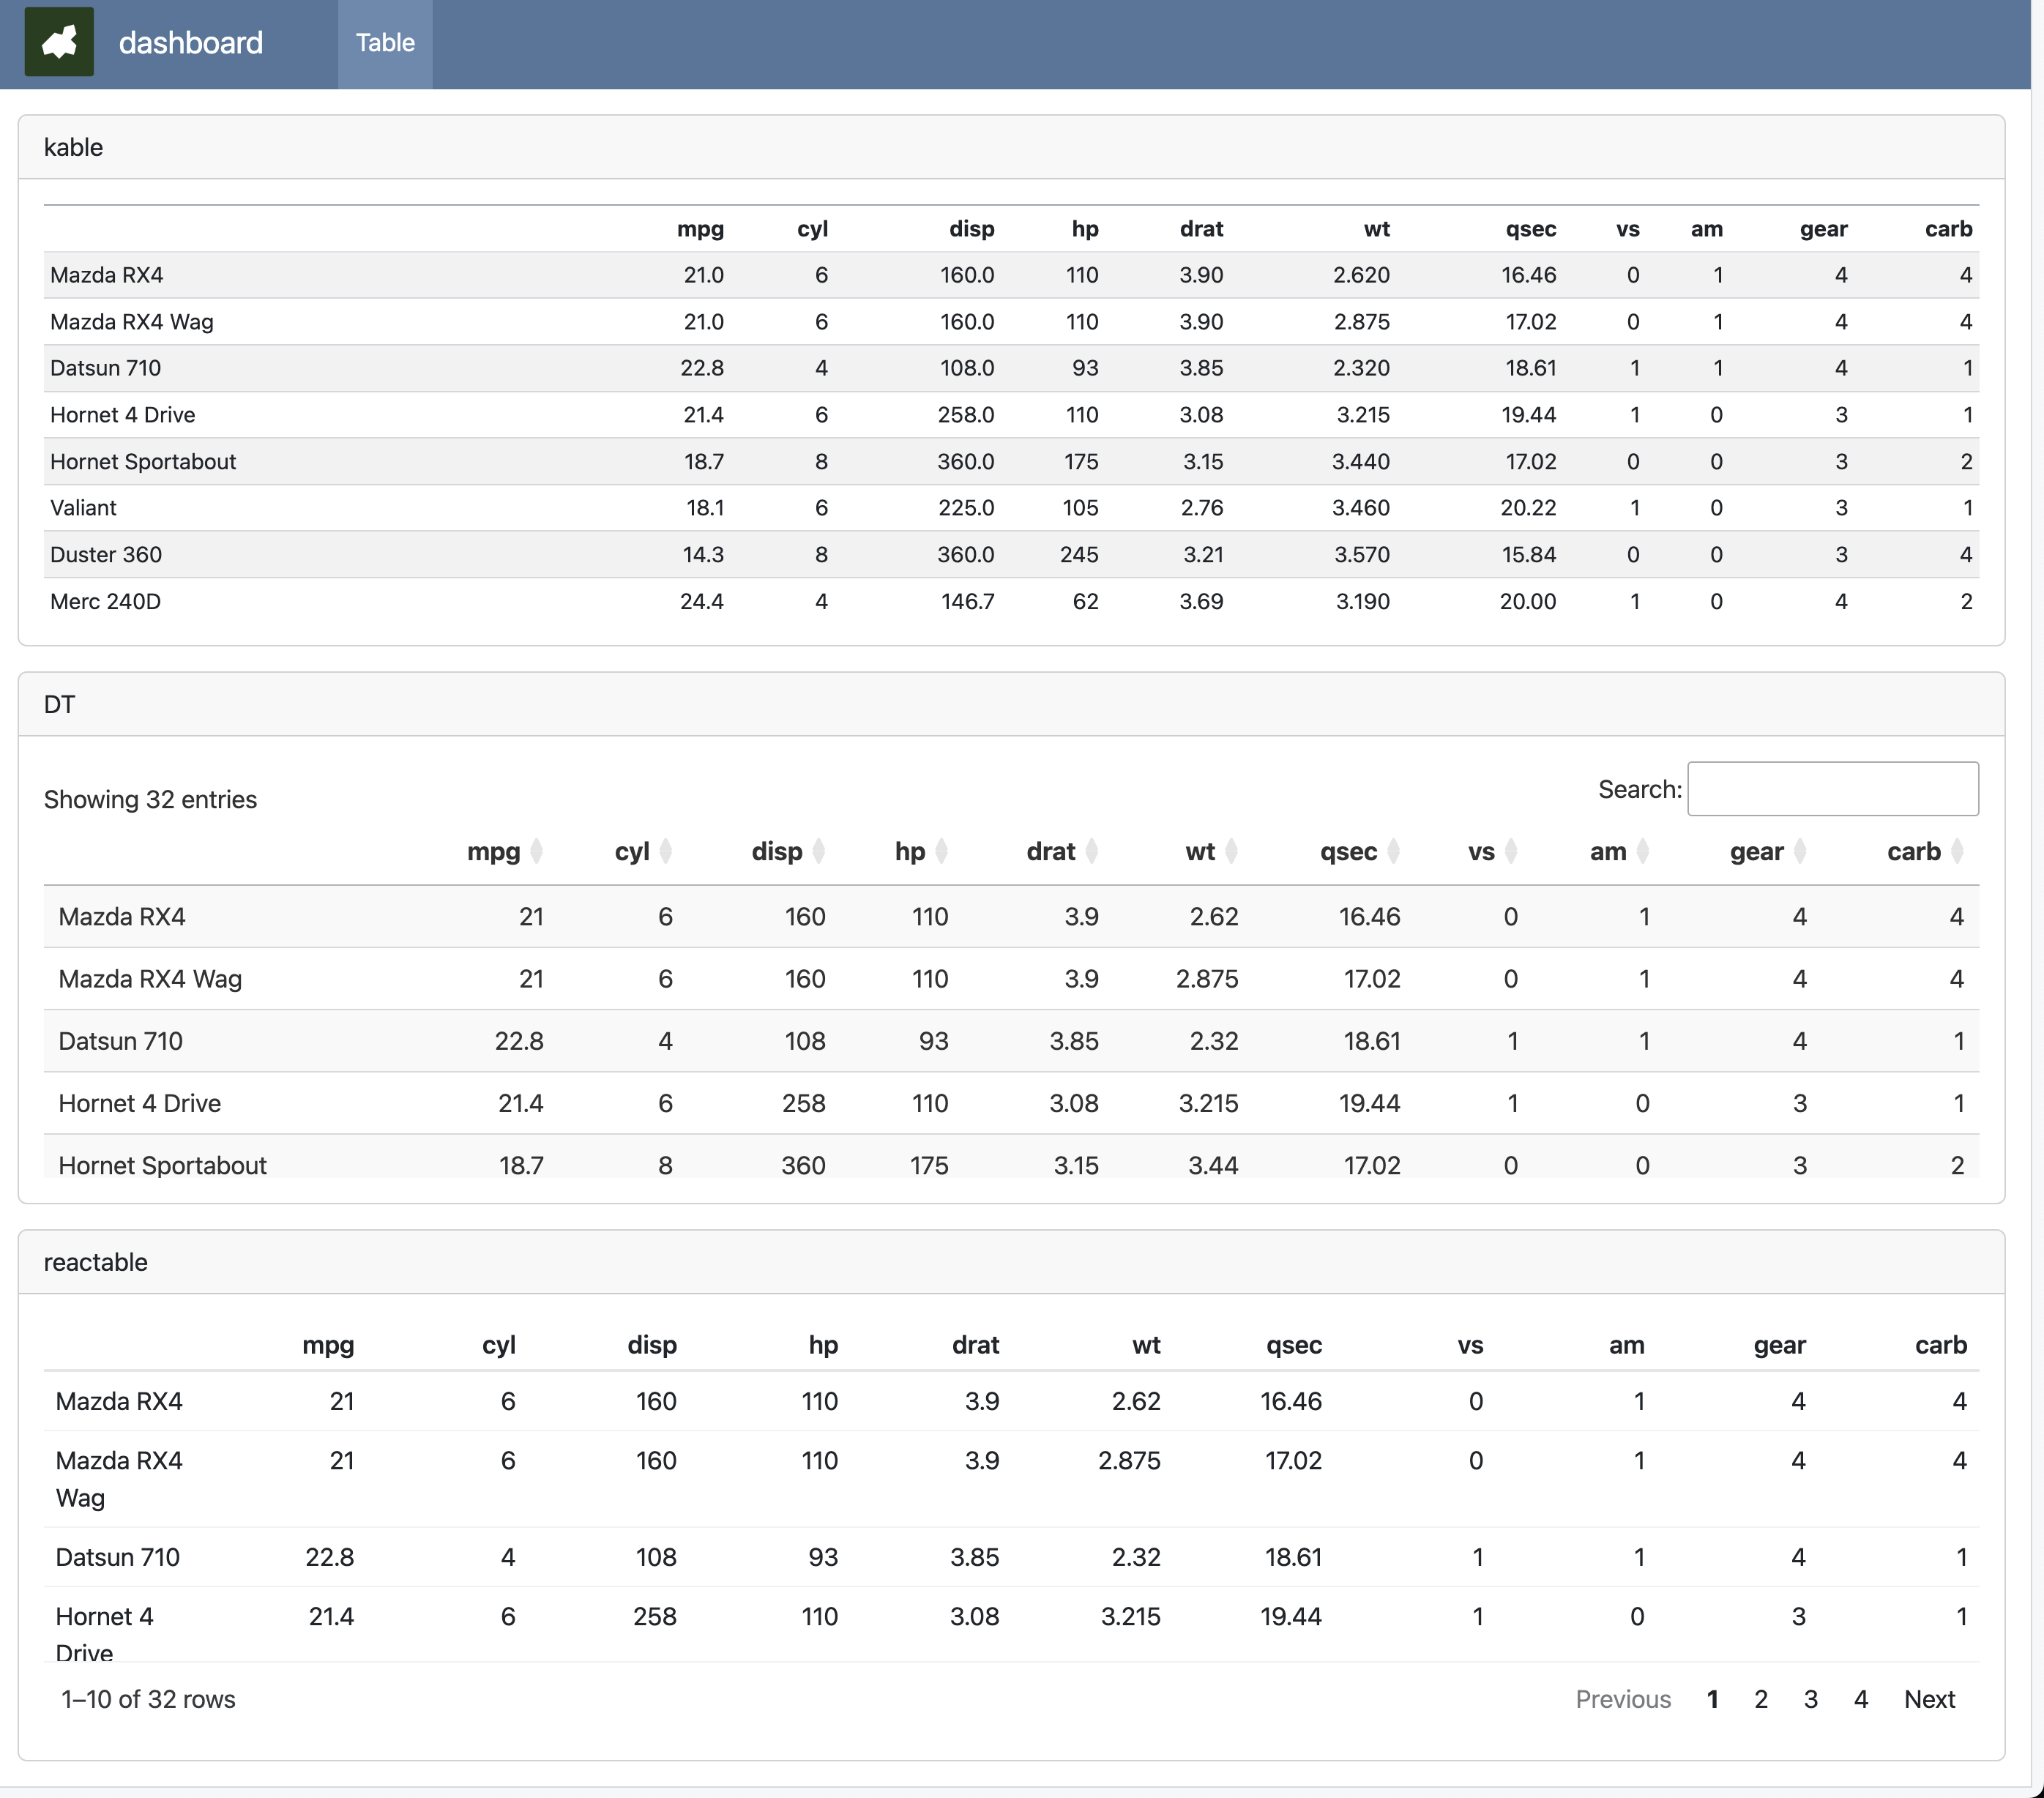
# value box
## Row

::: {.cell content='valuebox' title='Articles per day' icon='pencil' color='primary'}

```{.r .cell-code}
list(
  value = 343
)
$value
[1] 343:::
list(
  icon = "chat",
  color = "primary",
  value = 116
)
$icon
[1] "chat"
$color
[1] "primary"
$value
[1] 116list(
icon = "trash",
color = "danger",
value = 222
)$icon
[1] "trash"
$color
[1] "danger"
$value
[1] 222
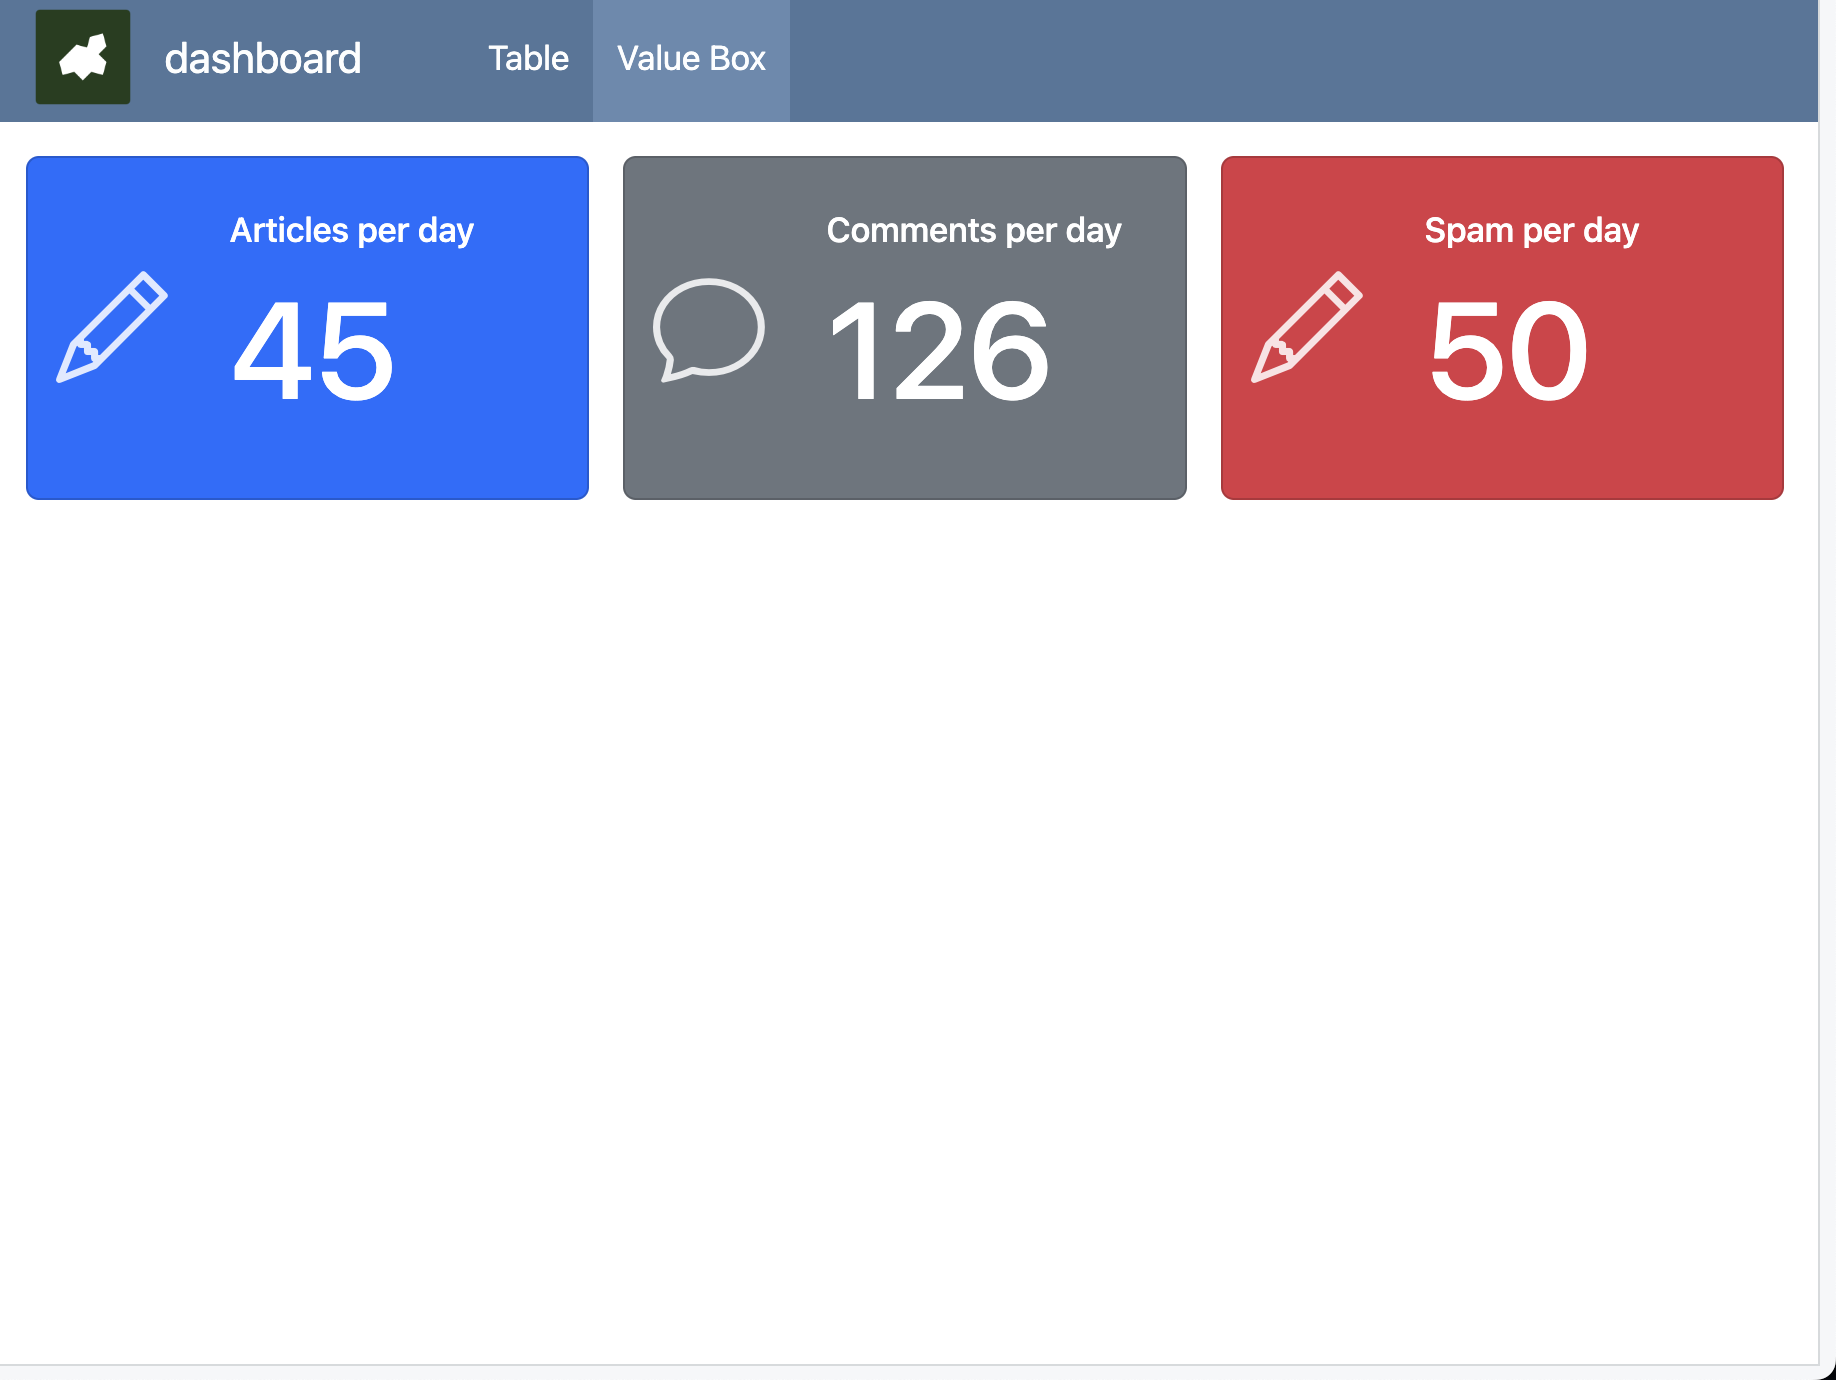
- 아이콘 박스
<https://icons.getbootstrap.com/>
### 10. 테마 바꾸기
[테마종류] <https://bootswatch.com/>
- YAML 에 넣기
theme: cosmo ```